Introduction to Bicycle Wall Hanger
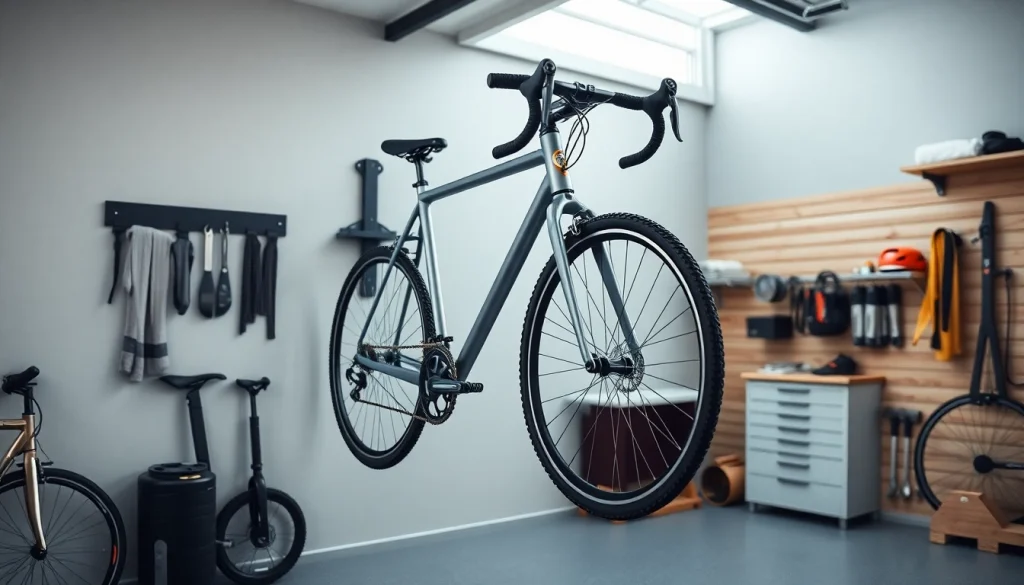
Finding effective storage solutions for bicycles can be a challenge, especially in homes with limited space. One popular and efficient method for storing bikes is through the use of a Bicycle wall hanger. These innovative devices allow cyclists to suspend their bikes off the ground, minimizing clutter and maximizing space. In addition to freeing up floor space, a bicycle wall hanger can contribute to the aesthetic appeal of a room, making it a practical choice for both functionality and design.
Understanding the Benefits
The bicycle wall hanger offers numerous advantages for individuals seeking bike storage solutions. Here are some of the most notable benefits:
- Space-Saving: Hanging a bike on the wall frees floor space and allows for better use of limited areas, particularly in apartments or small garages.
- Organization: A wall-mounted system helps keep bikes organized and easily accessible, eliminating the hassle of moving other items out of the way to reach a bike.
- Protection: Keeping bicycles off the ground protects them from potential damage and makes them less susceptible to environmental factors like dirt or moisture.
- Aesthetic Appeal: Many modern bicycle wall hangers are designed to be visually appealing, turning a bike into a statement piece or decorative element within a space.
- Easy Access: Wall hangers offer quick access to bikes, making it convenient for spontaneous rides or regular commutes.
Types of Bicycle Wall Hangers
Understanding the different types of bicycle wall hangers is essential for selecting the right one for your needs. The main types include:
- Horizontal Hangers: These types require mounting the bike horizontally against the wall, typically using cradles or hooks that support the frame.
- Vertical Hangers: Vertical options suspend the bike by the wheel or frame, saving even more space by allowing bikes to be stored side by side.
- Adjustable Hangers: Some modern designs allow adjustments to accommodate various bike styles and sizes, enhancing versatility and usability.
- Foldable Hangers: These types can collapse flat when not in use, making them ideal for tight spaces where a permanent fixture would be impractical.
Choosing the Right Wall Hanger for Your Space
Selecting the appropriate bicycle wall hanger depends on several key factors:
- Space Consideration: Measure your space to ensure the hanger fits comfortably while allowing for easy bike access.
- Bike Type: Different types of bikes (mountain, road, hybrid) may have specific storage needs, so choose a hanger designed for your bike’s characteristics.
- Weight Capacity: Verify that the wall hanger can support the weight of your bike, including any accessories like racks or fenders.
- Installation Requirements: Be aware of what tools and hardware are needed for installation, and choose a system that matches your skills and preferences.
- Design and Aesthetics: Look for a design that complements your space and meets your visual preferences.
Installation Tips for Bicycle Wall Hanger
Essential Tools for Installation
Before you start the installation process, gather the necessary tools to ensure a smooth experience. Essential tools typically include:
- A drill with appropriate bits
- Stud finder
- Screwdriver (either manual or electric)
- Level to ensure straightness
- Measuring tape
- Pencil for marking drill points
Step-by-Step Installation Guide
Follow these steps to properly install your bicycle wall hanger:
- Choose the Location: Identify a convenient wall space, ideally close to an entrance or your living area.
- Locate the Studs: Use a stud finder to locate wall studs for secure mounting. Mark their positions with a pencil.
- Measure and Mark: Measure and mark where the hanger will be attached, ensuring it is level and positioned appropriately.
- Drill Pilot Holes: Drill pilot holes into the studs where you made your marks, using the appropriate drill bit size.
- Attach the Hanger: Use screws to secure the bicycle wall hanger to the wall, ensuring it is tight and stable.
- Check Stability: Once attached, check the stability of the hanger before placing your bike on it to prevent accidents.
Common Installation Mistakes to Avoid
To ensure a successful installation, consider the following common mistakes to avoid:
- Not Using Studs: Failing to anchor the hanger to wall studs can lead to instability and potential accidents.
- Incorrect Height Placement: Installing the hanger too high or too low can make accessing the bike difficult.
- Overtightening Screws: Overtightening can strip the screw holes, making the installation less secure.
- Ignoring Weight Limits: Don’t exceed the weight capacity of your hanger, which could lead to failure and damage.
Organizing Your Space with a Bicycle Wall Hanger
Effective Space Utilization Techniques
Maximizing the use of available space is essential, especially in urban living spaces. Here are several techniques to efficiently organize your area with a bicycle wall hanger:
- Vertical Storage: If floor space is limited, consider using vertical space by stacking bicycles using vertical hangers or racks.
- Incorporate Shelving: Add shelves above or next to your bicycle storage to hold accessories, helmets, or tools, creating a multi-functional area.
- Zone Alike Items: Group related items together, such as biking gear and accessories, for easy access and organization.
- Color Code Storage: Use color labels or bins to differentiate between various types of gear and make organizing and finding items easier.
Incorporating Additional Storage Solutions
To enhance your storage capabilities, consider integrating other storage solutions along with your bicycle wall hanger:
- Hooks and Racks: Use additional hooks for hanging helmets, backpacks, and other biking paraphernalia.
- Storage Bins: Utilize storage bins to store smaller items like tools, cleaning supplies, or bicycle accessories that can clutter the area.
- Cabinets and Lockers: For a more organized approach, cabinets or lockers can be installed adjacent to the hanging system.
Visual Appeal and Organization
Creating an appealing space is just as important as its functionality. Here are ways to enhance the aesthetic factor while keeping it organized:
- Artwork: Use the area around the bicycle wall hanger to display biking-themed artwork or photographs, creating an engaging visual space.
- Color Coordination: Choose wall hangers and storage solutions that match or complement the room’s color scheme for a cohesive look.
- Shelving Design: Opt for stylish shelving units that not only serve a storage purpose but also add to the décor.
Maintenance and Care for Your Bicycle Wall Hanger
Regular Checks and Safety Precautions
To ensure your bicycle wall hanger remains in optimal condition, it’s essential to perform regular maintenance checks:
- Inspect Stability: Periodically check the screws and anchor points to ensure they remain tight and secure.
- Weight Limit Compliance: Be mindful of the weight limit and adjust as necessary if you add new accessories to your bike.
- Clean the Area: Keep the storage area clean and free from obstructions to maintain safety and ease of access.
Cleaning and Maintaining Durability
Cleaning your bicycle wall hanger is vital for longevity:
- Wipe Down Regularly: Use a damp cloth to remove dust and debris from the hanger.
- Inspect for Corrosion: For metal hangers, check periodically for signs of rust, especially if mounted in humid conditions.
- Lubricate Moving Parts: If your hanger has adjustable features, ensure they are lubricated to maintain smooth functionality.
Addressing Wear and Tear
Over time, wear and tear may occur, and addressing issues promptly can prevent further damage:
- Replace Damaged Components: If hooks or screws show signs of wear, replace them immediately to avoid accidents.
- Reassess Installation: If the hanger becomes unstable, reassess the installation points and consider moving to a different wall location.
- Regular Upgrades: If your needs change, such as adding more bikes or equipment, don’t hesitate to upgrade to a more robust system.
Exploring Advanced Uses of Bicycle Wall Hanger
Creating a Home Cycling Studio
For cycling enthusiasts, converting a part of your home into a cycling studio can be a rewarding project. Using a bicycle wall hanger in this setup allows for a neat and functional environment:
- Floor Space for Fitness Equipment: With bikes hung on the wall, floor space can be utilized for yoga mats, weights, and other fitness equipment.
- Multi-Functioning Room: Design the studio to serve as both a workout and social space, making it a versatile area in your home.
Innovative Design Ideas for Small Spaces
In smaller homes or apartments, creativity is key to maximizing your space:
- Use Minimalist Designs: Opt for sleek, simple wall hangers that minimize visual clutter.
- Dual-Function Structures: Consider unloadable furniture that doubles as bike storage, such as a bench that incorporates a hanger beneath.
Using the Wall Hanger for Other Outdoor Gear
Aside from bicycles, a bicycle wall hanger can be versatile enough to hold different types of outdoor gear. Here are a few examples:
- Surfboards: Similar hanging methods can be adapted for surfboards, providing a unique storage solution in garages or beach houses.
- Winter Sports Equipment: Snowboards or skis can also benefit from wall-mounted storage to keep them organized and off the ground during off-seasons.
You may also like
-
Expert Tips for Window Replacement Tigard Oregon: Enhance Your Home’s Efficiency and Aesthetics
-
Elevate Your Space: Innovative Approaches to Interior design
-
Elevate Your Space with the Timeless Beauty of Sheepskin Rug
-
Crafting Beautiful Spaces: Essential Insights into Interior design
-
Essential Home Gym Equipment for Every Fitness Enthusiast